During the Hindenburg’s final landing approach, with the ship tail heavy and in need of additional weight in the bow to help compensate, first officer Captain Albert Sammt sent an order via telephone to the crew’s mess: “Six men forward.” Six off-watch crew members, three mechanics and three cooks, responded to the order and made their way along the keel to the ship’s bow to join six of their comrades who were already there manning their landing stations and operating the forward mooring tackle. Of these 12 men, only three of them would end up surviving the fire that broke out several minutes later.

(Diagram courtesy of David Fowler)
Most people familiar with the events of the Hindenburg disaster are aware of this, however when they try to picture exactly where these crew members were bound, even seasoned airship historians tend to draw a bit of a blank. What did the bow mooring area look like? As thoroughly photographed and documented the Hindenburg is, it turns out that this is one of the few parts of the ship of which virtually no photos survive, even in the extensive Zeppelin Archive in Friedrichshafen. Even written documentation on this section of the Hindenburg is scarce.
Several years back, I was fortunate enough to take part in a fascinating round-table email discussion with several very knowledgeable airship scholars (Rick Zitarosa, Dan Grossman, Dennis Kromm and Andreas Horn) and a gifted drafting engineer named David Fowler in which we attempted to reconstruct the Hindenburg’s bow mooring station. David had already drawn up brilliant, finely detailed structural diagrams of the LZ 129 Hindenburg and her sister ship, the LZ 130 Graf Zeppelin. The idea was to assist him in adding the mooring platforms to his work while satisfying our own curiosity as historians.
Via a particularly extensive piece of detective work, involving close examination of Hindenburg wreckage photos, perusal of a few contemporary written descriptions, some educated guesses and just a wee bit of luck, we were able to approximate the internal layout of the Hindenburg’s bow. Here, then, is what we know about what this integral yet virtually forgotten part of the Hindenburg looked like.
Forward of the control car, the Hindenburg’s keel walkway began to slope upward toward the bow. Alongside the keel here were officers’ cabins, freight storage areas and observation windows. As the angle of the keel increased, the wooden catwalk gave way to duralumin stairs, which began at Ring 233. There were also small platforms alongside the keel for the crewmen called forward to help trim the ship. Known as “galloping kilos”, these men would stand in these areas off of the forward keel so that their body weight would help to bring the bow down when the ship was tail heavy and needed to be brought quickly back to equilibrium. Most of the men called forward during the Hindenburg’s final landing took these positions to either side of the keel catwalk. There were similar areas situated alongside the keel in the aft portion of the ship to be used in the event that the ship became heavy by the bow.
The crewmen who were already at their forward landing stations, however, were even further forward than this. After climbing the keel stairway for eight meters or so, one would reach the mooring area proper, where crew members would handle the various ropes and cables used to bring the Hindenburg toward and secure her to her mooring mast. The mooring stations were on divided into two levels, a broad set of platforms running laterally from the keel below, and the main mooring platform above, where the Hindenburg’s axial catwalk ended and attached to the bow cone.
The following diagrams were created by David Fowler based on our group’s research, and are used here with his kind permission. I have taken the liberty of shading key features of the mooring area to make them more immediately visible.
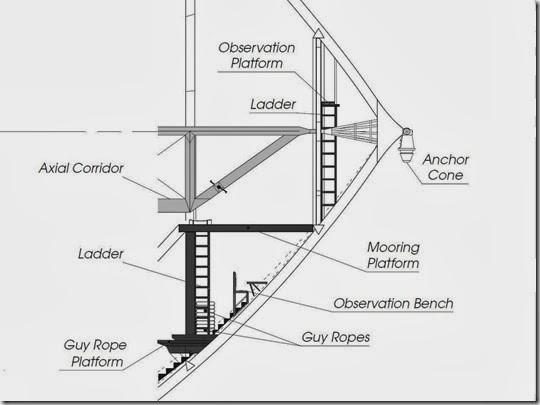
(Diagram courtesy of David Fowler)

Intermediate Ring 241 (outer circle) and Main Ring 244.5 (inner circle)
(Diagram courtesy of David Fowler)

Hindenburg’s bow mooring area (top view.)
(Diagram courtesy of David Fowler)
The lower platforms flanked the stairs at Ring 241, and were where the bow landing ropes were stored in large barrel-shaped coils during flight. These rope coils would be dropped during the landing maneuver through hatches situated just forward of these platforms.

(Diagram courtesy of David Fowler)
There were four of these hatches at the Hindenburg’s bow, arranged in pairs on each side of the keel. The yaw lines (also known as yaw guys or guy ropes) were dropped through the inboard hatches, and were braided manila ropes 400 feet long and 2 inches wide that would be attached to winches on the ground and used to keep the ship’s bow oriented toward the mooring mast. The spider lines were dropped through the outboard hatches, and were manila ropes that each ended in a cluster of 20 shorter manila ropes with hand toggles that the ground crew would hold onto as they physically pulled the ship into mooring position.
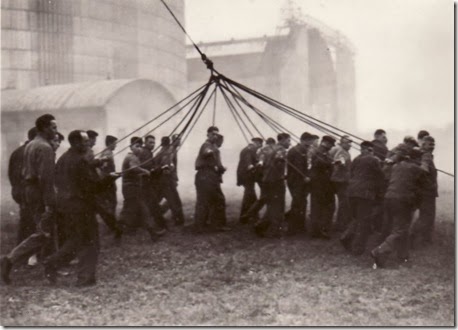
Both the yaw lines and the spider lines at the bow were attached to the ship via an external anchor point at Ring 244.5. After landing, crewmen would pull the ropes back into the bow via a short haul-up line that connected each rope to its respective hatch. Though the process of re-coiling each landing line does not seem to have been recorded, it is assumed that this was probably done using a hand-cranked winch, in all likelihood the one situated on the main mooring platform.

Just forward of the landing rope platforms and the hatches began a series of windows that ran almost all the way up the curve of the bow to just below the mooring cone. When the Hindenburg was first brought out of her hangar for her test flights in March of 1936, there were but four windows in her bow: two just forward of the rope hatches at Ring 241, and two at the forward end of the main mooring platform at Ring 244.5. However, when the ship was returned to the hangar at Löwenthal to have some finishing touches put on her during the second week of June, several additional windows were added, including a large four-paned one between the two rope platform windows and two long, vertical double-paned ones situated just below the main mooring platform windows. The new windows provided additional illumination for the bow work stations as well as creating a unique new observation area for the crew.
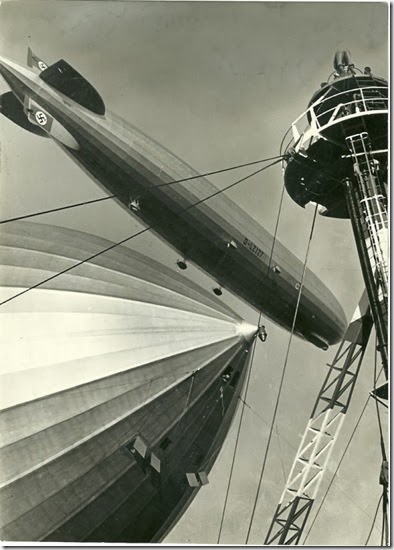
of her 3-day propaganda flight with the LZ 127 Graf Zeppelin (flying
overhead) on March 26, 1936, less than a month after her first trial flight.

Flughafen in Frankfurt, following the ship’s refitting at Löwenthal, June 5-16, 1936. Note the
addition of the large four-paned window and the two vertical double-paned windows.
At the very top of the keel walkway stairs, situated forward of the landing rope platforms, below and outboard of the main mooring platform, was a seating area featuring two benches and two tables, one on each side. The benches appear to have been of similar construction to the benches in the crew’s mess and the banquettes next to the observation windows in the passenger area. Though no record has yet been discovered showing when the benches and tables were installed in the Hindenburg’s bow, it is likely that they were added along with the new bow windows at Löwenthal during the second week of June in 1936.
 Starboard view of the lower rope platforms, showing the approximate location of the observation benches.
(Diagram courtesy of David Fowler)
This quickly became a favorite spot for off-watch crew members to spend their time. Each bench and table faced out one of the pair of long vertical windows, which provided an amazing view directly out the front of the ship. According to cabin boy Werner Franz, the engines were so far aft that one could sit there in almost completely silence, watching the world fly past the window. Unfortunately, no photos of this seating area are known to exist. The benches can be seen, however, in photos of the wreckage of the Hindenburg’s bow area.

be seen here in this photo of the wreckage of the Hindenburg’s bow
section. The structure is distorted from the impact with the ground,
and the entire hull has rolled about 15 degrees to port. However,
the general location of the benches can be seen (arrows).
Above this observation area was the main mooring platform. The crew would reach it via a ladder on the port side that was just aft of the portside observation bench. It was from here that the crew would lower the steel mooring cable that would be used to winch the Hindenburg up to the mooring mast. There were also connecting hoses stored here for topping off the Hindenburg’s gas cells with hydrogen when she was in port. The ship’s emergency radio transceiver was also located here, along with a pedal-powered generator so that it could be operated without having to rely on the onboard electrical systems.
and seat for the emergency transceiver’s pedal power system.
The Hindenburg’s axial catwalk ended at the main mooring platform, tapering from a triangular walkway approximately seven feet tall to a point that was connected to the bow frame at Ring 244.5. Here it attached to the frame by a jacking screw that allowed the crew to adjust the tension on the axial girder when they needed to remove portions of the catwalk for installation of the ship’s gas cells.

catwalk and the “crow’s nest” observation platform.
(Diagram courtesy of David Fowler)
There was also a large winch drum built into the aft end of the main mooring platform, oriented with its axis along the center line of the airship. Given the fact that the only connections to the ship’s electrical system in the ship’s bow were the two running lights situated above and below the nose cone, this winch drum was almost certainly operated manually. There was a double-handled hand crank attached to the forward end of the axial girder as it sloped upward toward its forward attachment point, and in all likelihood this was used to operate the winch drum. As mentioned above, this, presumably, was how the landing ropes were hoisted back into the ship after landing and wound into coils to be stored on the lower rope platforms.
 In this rare color photo taken during construction of the Hindenburg’s virtually
 identical sister ship, the LZ 130 Graf Zeppelin, we get some sense of how the
main mooring platform was arranged. With the view facing aft from approximately
Ring 244.5, the front end of the axial catwalk can be seen along with the attached
hand crank. The aft end of the mooring platform and the winch drum are at lower center,
with the aft upright of the access ladder visible along the lower right edge of the photo.
This same hand crank may also have been used to lower the Hindenburg’s main mooring cable, although there appear to be no records to confirm this. The mooring cable was a steel 20mm wire that ran out through the nose cone and was lowered by hand during the landing maneuver. Once it reached the ground, the mooring cable would be connected up to a motorized winch on the mooring mast that would pull the ship to the mast and draw the mooring pendant directly into the “flower pot” socket atop the mast where it would then be secured.
Two trapezoidal observation windows were cut into the bow right directly forward of the main mooring platform. In flight, these windows were closed with panes of the same clear celluloid that formed the rest of the ship’s windows. During landings, however, these panes could be removed and stowed against the bow girders beside the windows, allowing the crew members stationed there to communicate with the landing crew atop the mooring mast. If need be, a crew member could (and on at least one occasion actually did) step across to the mooring mast from one of these windows to assist in securing the ship.
During the Hindenburg’s second landing at Lakehurst, NJ on May 20, 1936,
with gusty winds complicating the mooring maneuver, a crew member drops
down to the top of the mooring mast to assist the American landing crew in
connecting the ship’s mooring pendant to the mast’s “flower pot” connection.
Forward of the main mooring platform, a ladder led up to a smaller observation platform that served as the Hindenburg’s “crow’s nest”. This observation platform was used by the ship’s navigators to take star sights through a round hatch in the top of the bow. It was said that Captain Ernst Lehmann, during his off hours, would often sit up on this “crow’s nest” platform, one of the highest and most remote vantage points in the Hindenburg’s structure, and play his accordion.
As mentioned before, very little photographic evidence exists to show what the Hindenburg’s bow mooring area looked like. However, within the past few years, a home movie has surfaced, taken by a passenger on a tour of the ship (likely conducted by one of the stewards) during a flight to America in September of 1936. Two shots in this movie footage appear to show the mooring area, albeit for a few fleeting moments and in fairly tight quarters. A collage of screen captures opens these shots up somewhat, allowing us to see what may be the only existing images of the mooring area as it appeared prior to the disaster.
The following image is clearly identifiable as a view looking down from the port side of the main mooring platform. The main platform’s access ladder can be seen at lower right, with a coiled landing rope visible at bottom center:
The curving pipe that rises from the ladder’s upright appears to be holding the bottom of the gas cell up and away from the mooring area. However, it is unmistakable how closely the hydrogen gas bag surrounded the crew on the mooring platforms.
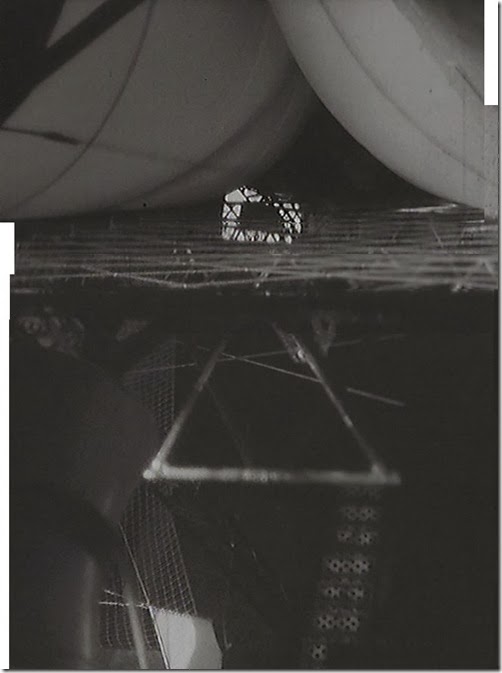
The other image is something of a puzzle. It appears in the home movie immediately prior to the previous image, which makes it likely that it is another view of the mooring area. The V-shape of the keel walkway frame can also be seen, along with the aluminum steps that led to the ship’s bow. The same netting seen aft of the rope coil in the first image is also visible here.
(Film footage courtesy of the US Holocaust Memorial Museum)
However, it’s difficult to get a sense of where precisely the person was standing when they took this footage. The two light-colored curved objects at the top of the image appear to be a gas cell. Given the fact that the forward-most cells draped over the axial catwalk, it would seem that we are somewhere below the axial (which would be tucked up above the fold of the gas cell) and looking down on the keel walkway, panning up forward to look toward one of the bow windows (the light square in upper center.)
The question is, where is the passenger standing? It has to be somewhere above the keel walkway, but below the axial catwalk. Since the stairs and the fold of the gas cell seem to indicate a perspective vanishing point toward the upper right corner of the image, and since we can see light through a window or hatch at upper center, it would seem that the footage cannot have been taken from the main mooring shelf looking aft. Otherwise we would not see any of the windows or hatches in the position that we do here. Presumably, this would place the camera somewhere in the area of Ring 233 or the next intermediate ring forward.
The problem being, of course, that there do not seem to have been any elevated platforms or other installations near Ring 233 that the passenger could have stood upon in order to take this shot. And it is difficult to imagine that the crew member who served as the tour guide would have allowed a passenger to simply start climbing girders in order to take movie footage
To add to the mystery, however, there is the spool shaped object at lower left. It appears to be a pulley or capstan of some sort, evidently quite close to the camera. If we are indeed looking forward from a vantage point aft of the mooring platforms near Ring 233, then what could this object be? Any pulleys or capstans for the mooring tackle would be at least several meters forward of this position. Furthermore, the angle of this spool shaped object doesn’t line up with the apparent perspective indicated by the stairs, the gas cell crease or the net just below the cell. Without further visual context as to location, the appearance of this object doesn’t make much sense.
With luck, more documentation or photos will eventually turn up that will give us a more detailed view of how this area of the ship was set up.
Finally, let us take a look at some of the wreckage photos that our group often referred to during our research. First, two photographs of the Hindenburg’s wreckage that show the internal structure of the bow – or, at least, what was left of it after the crash.
First, a view from the port side, taken from approximately the first intermediate frame aft of Ring 233:
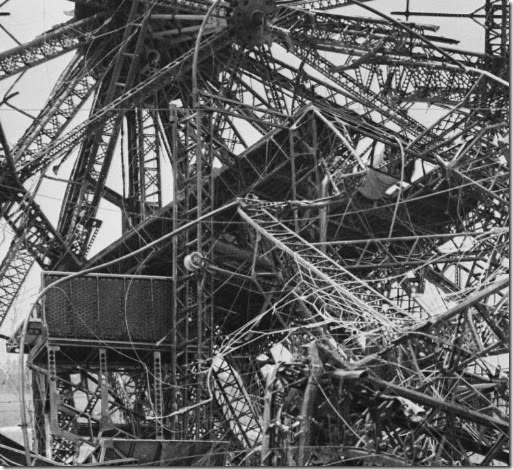
In this view, we can see one of the ship’s fuel oil tanks at lower right, laying alongside the remains of the keel catwalk and the axial catwalk. Forward, just below the reinforced bow structure, the black underside of the main mooring platform can be seen with its aft end tilted up approximately 20 degrees by the force of the bow’s impact with the ground. Additional detail may be seen in the cropped close-ups that follow:
This close up of the main mooring platform shows some of the mooring area’s key features, including the portside observation bench and the mooring platform’s access ladder. Note the pulley attached to the aft upright of the ladder. This was likely used in hauling up the landing lines via the winch drum, which can be seen in the cut-out section on the mooring platform’s aft end.
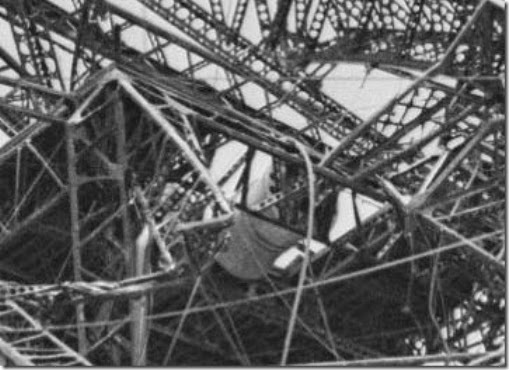
The light-colored winch drum can be seen more clearly here, mounted into the mooring platform. It does not have anything wound around it, indicating that the crew probably did not use it for lowering the steel mooring cable, only about 40 feet of which had been paid out through the mooring cone at the time of the fire.

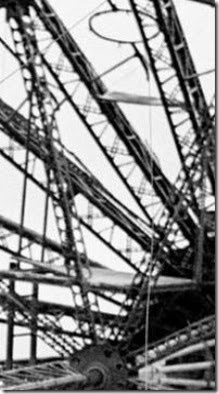
This detailed close-up shows the “crow’s nest” area. The ladder leads from just forward of the mooring platform to the small observation platform, which can be seen just above the “hub” of the wagon wheel shaped girder reinforcement at Ring 244.5. At the very upper right corner of the photo is the circular frame for the hatch through which the navigators would take their star sights. The small dark rectangle just below the hatch frame may be a writing surface that the navigators could use while making sight notations.
Here, across the lower part of the photo, can be seen the aft edge of the portside rope platform. The two-level stair step design shown in David Fowler’s diagrams is evident here. The spider line rope coil would probably have been stowed on the higher, outboard part of the platform. Since it was not dropped during the landing maneuver, it very likely fell aft as the ship’s bow tilted upward during the crash.

This heavy manila rope, tangled in the framework just forward of the fuel tank, may be the port spider line.
A second internal wreckage photo, taken from just about the same location on the starboard side, provides some additional context and detail:

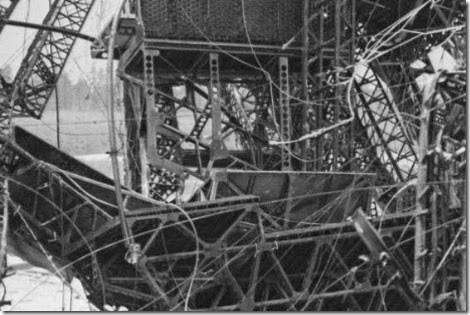
Here we see the internal bow wreckage from the starboard side. Many of the same installations from the port side are mirrored here, some in greater clarity. However a number of additional features can be seen as well.
In this view of the main mooring platform, we see one of the celluloid window panes for the observation windows, removed from the window frame and stowed amongst the girders at right. Just in from this are two hoses, which were likely used to reinflate the gas cells with additional hydrogen after landing. In the upper center of the photo can be seen the pedal power tripod shown earlier in the article. It appears to be permanently affixed to the main mooring platform, rather than being something that would have been set up only when the emergency transceiver was needed.
This cropped image shows the starboard rope platform in the lower quadrant of the photo. The starboard spider line coil can be seen at lower center, and unlike what we saw in the port side wreck photo, netting can be seen attached across the entire aft edge of the platform. The starboard observation bench is just above the rope coil, and from this angle the table can also be seen. Another pulley can be seen against the back of the bench, but since there isn’t an access ladder on this side of the mooring platform, the pulley is attached to a boom of some sort. Just beyond the lower arm of the boom are the top three steps of the keel stairway.
This reverse angle of the crow’s nest shows the platform a bit more clearly. The one corner of the platform’s flooring, right at the head of the ladder, was apparently popped from its frame by the force of the impact. The small table surface for the navigators is slightly easier to see here, just below the circular hatch frame above.
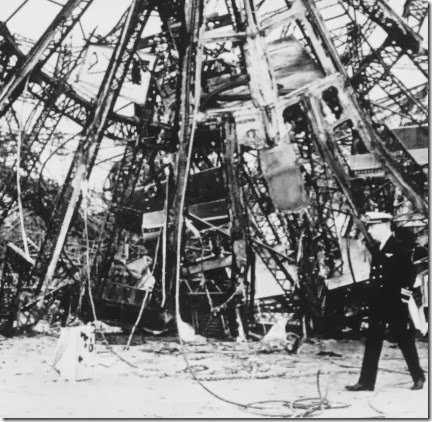
This image, taken the day after the disaster, shows an external view of the bow wreckage. The US Navy officer at lower left provides some sense of scale. Various features of the mooring area, including the winch drum and the starboard observation bench, can be seen here. This is also an excellent view of the steel mooring cable, which descends from the mooring pendant attached to the nose cone. The white box sitting on the ground at lower center is the ship’s emergency radio transceiver, which somebody apparently removed from its spot on the main mooring platform sometime after the fire.
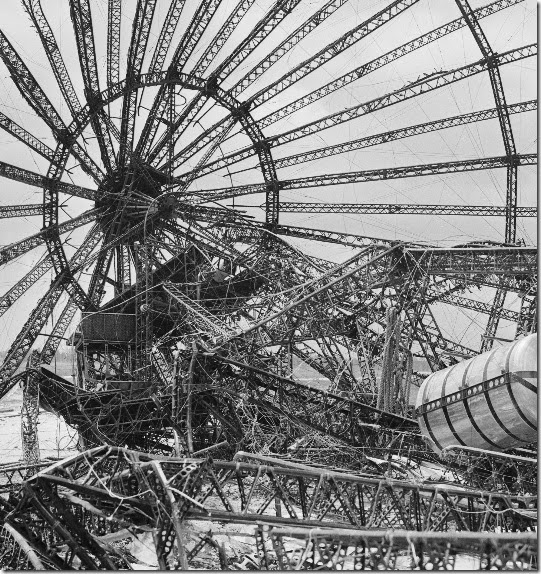
One last Hindenburg wreckage photo, taken during salvage operations in July of 1937, shows the section from Ring 244.5 forward to the nose cone after being cut from the remainder of the wreckage.
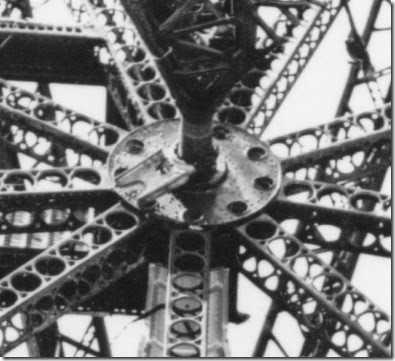
The “wagon wheel” design of the bow reinforcement structure is seen clearly in this photo. We can also see the very forward end of the main mooring platform is still attached to the lower side of Ring 244.5, as well as the ladder to the crow’s nest platform just forward and to the left of the central hub of the support structure. Two additional details are visible here that we did not see in the other wreck photos.
Here we see a detailed close up of forward connection for the axial catwalk. The girder has narrowed down to a point, and the jacking screw that was used to adjust tension on the axial catwalk can be seen at approximately the 8:00 position. Presumably, the crew would tighten or loosen the jacking screw tensioner using a large wrench. Loosening it would create just enough “play” in the axial catwalk to allow individual sections to be removed when a gas cell needed to be replaced. Except for a few at the extreme bow and stern that merely draped over the axial, the Hindenburg’s gas cells were donut-shaped and completely surrounded the axial catwalk. Therefore, a newly installed cell had to be carefully pulled over its corresponding axial catwalk section like a sleeve. The only way to do this was to lower each individual axial section down to the keel, thread the new cell around it, and raise the whole thing back into place so that the cell could then be inflated:
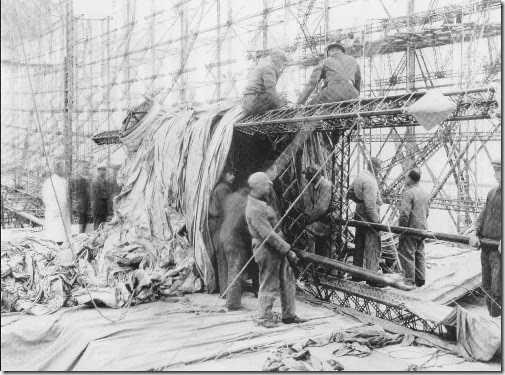
Another detail visible in this last photo is what may have been the location of the Hindenburg’s emergency radio transceiver:
Here we see a laterally attached box girder on top of which is mounted a small white board. This could have simply been a work surface for the crew in the event that they needed to quickly splice a landing line, but it is also just about the right size for the ship’s emergency transceiver, shown below (lower left corner of photo) after being removed from its position in the bow following the disaster:
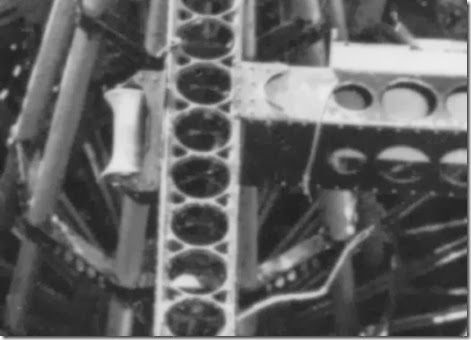
Just to the left of this small counter, attached to the vertical upright of the bow reinforcement structure, is a white spool. It looks too shallow to run a rope through, but it could conceivably have held the 20 meters of antenna wire that the Hindenburg’s emergency transceiver used:
Dennis, Dan, Rick, Andreas, David and I spent a month or two back in late 2009 poring over this material, trying to make sense of small details in black-and-white photos of burned-out duralumin wreckage from almost 3/4 of a century before. Gradually, a general image of what the mooring area looked like began to take shape. David drew up some preliminary diagrams, which we all continued to discuss (and sometimes debate) at length. We were slowly making progress, but it still felt like we were feeling our way along in the dark.
Then I got an email from Art Paulson, another very learned scholar of Zeppelin history. Art has always had a knack of turning up at just the right time with the perfect photo or obscure bit of information to help solve one Zep-related mystery or another. This time was no different. I had told him about our research and he had sent us the port and starboard internal bow wreckage photos shown here (the latter of which none of us had ever seen.)
And then one day, after our group had seemingly exhausted every available avenue of investigation and arrived at what we felt was a reasonably accurate approximation of what these internal bow structures looked like, Art sent us something that we were all convinced no longer existed.
An original blueprint/engineering drawing of the Hindenburg’s bow installations:
Art had chanced upon this drawing while going through the Lockheed Martin Collection at the University of Akron Archives. It was almost certainly from among the materials that Luftschiffbau Zeppelin had provided to Goodyear-Zeppelin during the 1930s (see the previous article on the LZ 128 for additional background on the LZ/GZ collaboration.) Art managed to get a good digital photograph of the drawing, which he then further cleaned up in Photoshop and sent along to us. As far as our little group and our research was concerned, this was the holy grail, a map of Atlantis and the long-lost cocktail recipe for the “Maybach 12” all rolled into one.
Though the drawing was later stamped “valid for LZ 130”, this is an early layout for the LZ 129. The position of the main mooring platform’s access ladder is different, and the rope platforms aren’t quite the same as how they would ultimately appear in the finished airship, but the overall design is very similar indeed to what our group had settled on. There were some differences in elevation and attachment points, which helped us to further refine the new diagrams that David had drawn up. And there were a lot of features that did not appear in this engineering drawing, though some of them were listed on this engineering drawing and referred to as being present on a different drawing in the series (A6708, which I hope will turn up eventually.)
It was a fantastic way to pull all of our research together and refine David’s diagram of the bow mooring station into a “final” version – for now.
The search continues, however, for additional documents and photos that reveal further details about this part of the Hindenburg’s bow mooring area. Though we now seem to have a fairly strong basic idea of the layout, all we really have to base this on is a comparatively small body of documentation, a few post-wreck photos and the art of the educated guess. For such an important part of the ship, it is odd that so little would be recorded about it. With luck, there may be additional information and photos out there that will eventually be discovered and which will help to clear up lingering questions as to the precise design of this vital yet practically unknown area of the Hindenburg’s structure.
This article would not have been possible without the cooperative efforts of Dennis Kromm, Rick Zitarosa, Dan Grossman, Andreas Horn and David Fowler. The information contained in this article is the result of a months-long joint email correspondence and endless microscopic examination of Hindenburg wreckage photos as the six of us chased down every conceivable detail that was there to be uncovered.
Special thanks to David Fowler for creating the detailed structural diagrams of the Hindenburg used throughout this article. Short of tracking down heretofore undiscovered photos of the mooring area, David’s diagrams are about as close to the real thing as we’re likely to get.
Another key contributor was Art Paulson, who not only provided our group with the two photos taken inside the Hindenburg wreck, but who also managed to find an early engineering drawing of the Hindenburg's bow structure in an archive of Goodyear-Zeppelin documents. This helped to confirm some of our group’s conclusions, to clarify others, and to provide additional information that helped to greatly advance our research.








Nice piece of technological history, but beautiful in terms of its social dimension. Personalizing the event like this offers a nice angle that is rarely examined. -Guillaume
ReplyDeleteThank you, Guillaume! Glad you enjoyed the article, and I couldn't agree more about making that personal connection when presenting material like this. I love history and I love airships, but for me it's always been the people who make all of it come alive for me.
ReplyDeleteI thought it was particularly important to do so in this particular article, since close examination and attempts at recreation of the bow mooring station could very easily descend into tedious rivet-counting without at least some effort to connect it all to the crew members who used this part of the ship.
I debated whether or not to open the article with mention of the disaster, as I don't want every article in this blog to dwell on the last flight (though some necessarily will.) However, since most of the available photographic images of the mooring area come from wreckage photos, and since the story of the crew being called forward just before the fire is by far the most familiar bit of personal context when discussing the bow mooring area, I decided to just roll with it.
Patrick
I'm a historian and collector of the history of airships Graf Zeppelin and Hindenburg also collect postcards stationed aboard the two airships also have books of the time and old photos.
ReplyDeleteI am already a follower of your other blog, and that your Blog is also excellent, the articles are incomparable, has a rich literary to me that I'm a fan of this theme.
I wanted to ask you for permission to publish the articles of their Blogs, in my Blog
http://lz127grafzeppelin.blogspot.com.
I also put the source of their articles published in my Blog.
I thank you very much, your attention, and congratulations for the excellent research work.
John Dieter Weege
Very impressive attention to forensic details. Good job painting a vivid picture of the bow section and the myriad of details therein.
ReplyDeleteThanks, Chris! Coming from you, that's high praise indeed.
ReplyDeleteYeah, I was really pleased with how much detail we were all able to come up with, drawing as we were from such limited resources. It's such a cool part of the ship, and it's nice to have at least a general idea now of how it was set up.
(Ah, if only some "new" photos would fall out of somebody's attic...)
Patrick
By the way, everyone, be sure to check out John Dieter Weege's Graf Zeppelin blog. He has some excellent photos up there, many of which are from the old cigarette card albums from the 1930s, including one or two of the later albums that don't generally circulate as much. There's stuff there that I've never seen before.
ReplyDeletehttp://lz127grafzeppelin.blogspot.com
We're corresponding via email in response to his question above, but I wanted to make sure that everyone gets to take a look at his blog.
Patrick